PVC Support Spacing
PVC Support Spacing is the engineered maximum distance between pipe hangers or supports required to prevent sagging, stress, and joint failure in a pressurized or drainage system. Incorrect spacing is a primary cause of pipe “belly,” which leads to improper drainage, material stress, and code violations. This guide provides the technical specifications and installation practices for professionals.
The Diagnosis: Sagging Pipe and System Failure
A sagging PVC pipe, or “belly,” is not merely an aesthetic issue. In drainage systems, it creates low points where solids and debris accumulate, leading to chronic clogs. In pressurized systems, it induces undue stress on pipe walls and solvent-welded joints, increasing the risk of catastrophic failure. The root cause is almost always inadequate PVC support spacing, exceeding the maximum span the pipe’s stiffness can handle under load.
Technical Deep Dive: Calculating and Installing Proper Supports
Support requirements differ for horizontal and vertical runs and are dictated by pipe size, material (Schedule 40 vs. 80), temperature, and contents (water vs. sewage). The following procedure ensures a correct installation.
Step 1: Determine the Correct Maximum Horizontal Spacing
For Schedule 40 PVC pipe conveying fluids up to 73°F (23°C), the following table outlines the standard maximum support spacing. These intervals are based on IPC and UPC guidance and manufacturer engineering data.
| Nominal Pipe Size (inches) | Maximum Horizontal Support Spacing (feet) | Maximum Horizontal Support Spacing (inches) |
|---|---|---|
| 1 1/4″ and smaller | 4 ft | 48 in |
| 1 1/2″ | 5 ft | 60 in |
| 2″ | 6 ft | 72 in |
| 3″ | 8 ft | 96 in |
| 4″ | 9 ft | 108 in |
Critical Adjustments:
- Temperature: For hot water lines (above 73°F), reduce spacing by 25%. A 2″ hot water line should be supported at 4.5-foot intervals, not 6 feet.
- Schedule 80 PVC: While thicker-walled, support spacing does not significantly increase. Follow Schedule 40 spacing for reliability.
- Vertical Runs: Supports are required at the base of each stack and at every floor level (maximum 10-foot intervals).
Step 2: Select and Place Hangers Correctly
The type of hanger is as important as the spacing. Improper hangers can cause point loading and deformation.
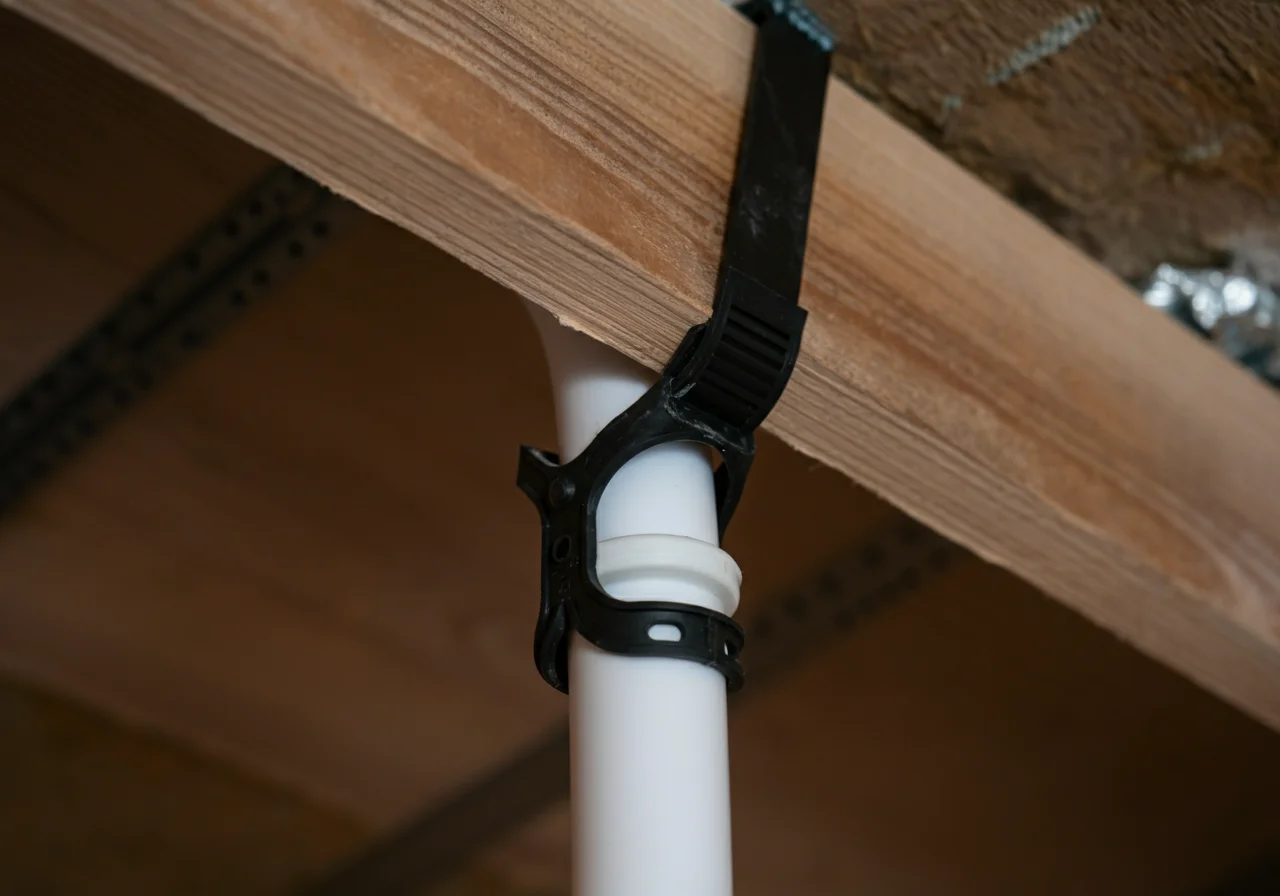
- Type: Use clevis hangers, split-ring hangers, or adjustable metal straps with a cushioned saddle. Never use galvanized perforated strap (“plumber’s tape”) directly on PVC, as it can cut into the pipe.
- Placement:
- Install a support within 18 inches of every change of direction (elbow, tee).
- Support both sides of a valve or union.
- Ensure hangers allow for axial thermal expansion/contraction; do not clamp the pipe rigidly.
- Tool Example: A Milwaukee M12 FUEL installation driver is excellent for quickly fastening hangers to wood or metal framing.
Step 3: Prevent Belly Formation During Installation
- Snap a Chalk Line: Before installing hangers, snap a straight, level chalk line along the intended pipe path to serve as a reference.
- Pre-Assemble and Support: For long runs, solvent-weld multiple sections on the ground. When lifting into place, use temporary supports every 4 feet to prevent sag before permanent hangers are installed.
- Check for Sag: Use a 4-foot level or a taut string line along the bottom of the installed pipe. Any visible gap indicates insufficient support.
Code & Compliance
Adherence to plumbing code is non-negotiable for system integrity and passing inspection.
- International Plumbing Code (IPC) 2021, Section 305: “Piping shall be supported in accordance with the manufacturer’s installation instructions… at intervals not exceeding the spacing specified in Table 308.5.” The table aligns with the spacing data provided above.
- Uniform Plumbing Code (UPC) 2021, Section 308.0: Provides nearly identical spacing requirements, emphasizing support near fittings and valves.
- Key Principle: Codes mandate support to prevent “strain” on joints. A sagging pipe directly violates this core principle.
Toolbox: Essential Gear for Proper Support
- Layout & Measurement: 25-ft Laser Level (e.g., Milwaukee Redline), Tape Measure, Chalk Line.
- Installation: Cordless Drill/Driver, Pipe Cutter (e.g., Ridgid plastic tubing cutter), Assorted Cushioned Hangers.
- Inspection: 4-ft Level, String Line.
Safety Warning
Always ensure the system is depressurized and drained before adding or adjusting supports. When working overhead, use proper ladders and fall protection. Wear safety glasses when cutting or drilling.
External Reference
For the definitive engineering standard on plastic pipe installation, consult the Plastics Pipe Institute’s (PPI) comprehensive handbook, which forms the basis for many code provisions:
PPI Handbook for Installation of Plastic Pipe.