Test Tee Location
The Diagnosis: Locating the Test Tee for DWV System Integrity
A test tee location is a critical, code-mandated fitting installed in a Drain-Waste-Vent (DWV) system to facilitate pressure testing. Its primary function is to provide a dedicated, accessible port for introducing water or air to test the system for leaks before it is concealed. Incorrect placement of this fitting is a common cause of inspection failure, as it must allow for a complete and verifiable test of all downstream piping. This guide details the precise placement rules, the relationship to cleanouts, and the inspection criteria that govern proper test tee location for hydraulic testing.
Technical Deep Dive: Installing and Utilizing a Test Tee
The test tee is a specialized sanitary tee fitting with a threaded, pluggable opening on its side inlet. Proper installation is a sequential, methodical process.
- Step 1: System Layout and Planning. Identify the most downstream point of the section to be tested. The test tee must be installed upstream of this point, typically at the base of the uppermost soil stack or at the transition from vertical to horizontal, to test all downstream branches.
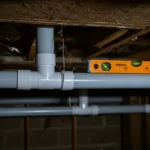
- Step 2: Fitting Orientation. The test tee must be installed so its side inlet is facing upward at a 45-degree to 90-degree angle from vertical. This orientation allows air to be purged from the system when filling it with water for a hydraulic test.
- Step 3: Installation and Piping. Solvent-weld or gasket-seal the test tee into the DWV line according to manufacturer instructions. The threaded opening must be fitted with a standard, removable plug (e.g., a cleanout plug). All other openings in the system, including fixture drains, must be securely capped.
- Step 4: Conducting the Hydraulic Test. Connect a water hose or test pump to the test tee opening. Fill the system slowly to allow air to escape through vent lines until water stands in the vent stack at least 10 feet above the test tee. Maintain this water column for a minimum of 15 minutes while inspecting every joint for leaks.
- Step 5: Post-Test Procedure. After passing inspection, the plug is reinstalled with pipe sealant. The test tee then becomes a permanent part of the system and often serves a dual purpose as a cleanout.
Code & Compliance: The Legal Framework for Testing
Adherence to plumbing codes is non-negotiable. The International Plumbing Code (IPC) and Uniform Plumbing Code (UPC) provide the definitive rules.
| Code Reference | Key Requirement for Test Tee Location | Practical Implication |
|---|---|---|
| IPC 312.5 (Test Tees) | “A test tee shall be installed at the base of the uppermost soil stack… to allow testing of the entire system.” | Mandates the tee’s placement to test all downstream piping from the highest point. |
| UPC 312.2 | Requires the test tee to be accessible and installed in a vertical stack. | Prevents installation in horizontal runs where air pockets would form, compromising test accuracy. |
| IPC 312.7 / UPC 312.4 (Test Pressure) | Requires a 10-foot (or 5-foot for low-rise) head of water for 15 minutes. | The test tee location must allow this water column to be achieved and observed in the vent stack. |
Failure to comply with these codes results in a failed inspection, requiring costly demolition and rework.
Toolbox: Essential Gear for the Job
Using professional-grade tools ensures a reliable, leak-free installation that will pass inspection.
- Cutting and Deburring: A power tubing cutter (like a Ridgid 101) provides square cuts on plastic pipe. A deburring tool is mandatory to prevent seal damage.
- Testing Equipment: A dedicated test ball kit or a high-quality test plug is essential. For complex systems, a Fluke pressure gauge can provide precise verification beyond the simple water column test.
- Installation: Use primer and cement compatible with the pipe material (PVC, ABS). A quality pipe wrench is needed for installing and sealing the metal cleanout plug.
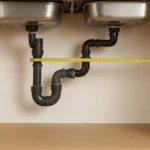
Test Tee vs. Cleanout: Dual Function and Key Differences
While a test tee often functions as a cleanout, their primary purposes are distinct. Understanding this is crucial for code compliance.
- Primary Purpose: A test tee is for pressure integrity testing during construction. A cleanout is for maintenance access to clear blockages during the building’s lifespan.
- Code Requirements: A cleanout (IPC 708) has specific spacing rules (every 100 ft, at every change of direction greater than 45 degrees). A test tee has specific placement rules for testing (base of stack). A single fitting can satisfy both requirements if its location meets the more stringent of the two rules.
- Inspection Focus: During rough-in inspection, the inspector verifies the test tee’s presence and orientation for the test. During final inspection, they verify the cleanout plug is accessible and properly sealed.
Safety Warning & Best Practices
WARNING: Always ensure the DWV system is completely isolated and all openings are capped before pressurizing. A hydraulic test places significant static pressure on joints; a blowout can cause water damage and injury. Never test a system with glued joints that have not fully cured per the cement manufacturer’s instructions.
Best Practice: Document the test with photos, noting water column height and test duration. This provides a record for the inspector and for future reference. Always consult the Authority Having Jurisdiction (AHJ) for any local amendments to the model codes.
External Reference
For the definitive engineering standards on plastic piping systems and pressure ratings, which underpin all hydraulic testing procedures, refer to the ASTM International standard: ASTM D2665 – Standard Specification for Poly(Vinyl Chloride) (PVC) Plastic Drain, Waste, and Vent Pipe and Fittings.